[elementor-template id=”11464″]
Pinterest is an absolute gold mine for getting free subscribers and traffic to your online blog or business. But if you’re not using it to its full potential, you’re really just wasting your time and missing out on a lot of potential sales!
If you’re just starting to use Pinterest to promote your blog, website, affiliate products, etc., or even if you’ve been using it awhile but aren’t seeing the results you want, this is the post for you.
Read below for some of the best tips and tricks I’ve learned along the way to use Pinterest to your advantage to boost your website traffic in ways that are easy and low-management.
1. Facebook Groups
I only recently started joining and actively posting to Pinterest and blogging groups on Facebook, but WOW… it has been HUGE for making my Pinterest account more successful, and it takes barely any effort. I seriously wish I had joined months ago, because my account would be SO much further along if I had. Keep reading to find out why..
Free Advice and Consulting
Have you paid or considered paying a consultant to look at your Pinterest account and give you some advice? As valuable as that can be, most of the advice you will need you can actually get on Facebook groups for free!
Some of the groups are run by people who consult professionally, and they’ll post exclusive tips, courses, videos, discounts, etc. just for their Facebook groups! Most of them also allow questions to be posted, so you can ask them about those little things on Pinterest that are confusing you or not working for you, and they’ll give you the answer without you spending a penny.
You’re also going to get free advice from potentially thousands of other Pinterest Business users just like you who may be more experienced or just “differently” experienced than you.
For example, I recently posted a struggle I was having with keywords for my pin descriptions and got some tips from another random user. I tried out his method, and I literally TRIPLED my average link clicks on the very next pins that I created! (Keep reading to find out specifics on keywords in descriptions!)
FREE advice from a random Pinterest user on Facebook TRIPLED my traffic… that’s unbelievable!
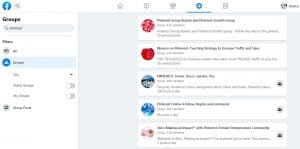
To find a Facebook group, click the little group’s button down at the bottom of the app, then click the search bar. Search for things like “Pinterest,” “bloggers,” “entrepreneurs,” etc. Most groups will have you answer a couple of questions then wait a day or 2 for approval, then you’re all set!
(Side note.. if you’re already pretty active on Facebook, CLICK HERE to learn how you could be making money doing Affiliate Marketing on Facebook!)
Free Followers, Repins, Clicks
Another huge benefit I’ve seen from Facebook groups is just the free traffic to both your Pinterest account and website.
A lot of them will do “Follow for Follow” type posts, where you post your profile link and then follow 10 other members’ profiles in return. I easily get 15-20 new followers from these posts, and I just do it on my phone while I’m eating breakfast.. so quick, so easy.
The best ones, of course, are the “Click for Click” ones though where members will actually click through your pin to your actual website. This will boost your pin popularity in Pinterest’s algorithm so more users see it, plus you will often end up capturing emails this way from the Facebook group members who click on your post!
(Side Note: If you don’t know how important it is to capture emails on your site or need tips on how to do so.. CLICK HERE.)
Pinterest Updates
The last reason I love Facebook groups is that the members keep each other updated on changes to the Pinterest algorithm, new Business account features (and issues… ugh), and any other news that Pinterest business account owners will need to know.
For example, the most recent big Pinterest update resulted in some big issues with boards and analytics for business accounts. I knew about it first thing in the morning because I had 10+ people post about it, so I didn’t freak out when I looked at my profile later in the day or waste my time trying to contact Pinterest to figure out what was going on.

2. Design Strategy
Hopefully you are at the point where you can design decent-looking graphics for your pins. If not, here are a few basic tips. If you feel good about your basic design skills, skip to the next paragraph!
- Use Canva. It’s free (upgrades available), easy to use, includes a database of commercial-use-approved stock photos and has so many customization options and tools
- Use bright or pastel colors (stay away from grey, brown and dark colors)
- Use 1-3 easy-to-read fonts
- Always brand your images! Put your logo in a similar spot on all pins (I prefer bottom-center)
Get your 10 FREE Canva pin templates HERE!

Audience-specific Pins
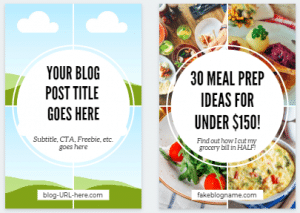
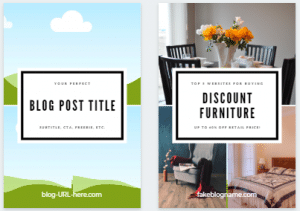
You probably know that when you’re designing pins for a new (or old) blog post, you should design 3-5 different images for one post. BUT. This does not mean that you should design one, then tweak the font or background and call it good.
Even though Pinterest will technically see this as a “fresh pin” which is very high on the algorithm, a pin that’s only slightly different from another one is not going to help you reach nearly as many users as you could.
Each pin design should have a different target audience. I’m going to say that again. Design each pin image with a specific and different sub-audience in mind.
If every single one of your pins for one URL has a photo of a mom with kids in it, you’re not considering the part of your audience who are NOT a mom with kids. Those people are not going to connect immediately with that pin, and may scroll past it without even giving it a shot.
Let’s use a food blog for an example. You write this fantastic article that has 20 quick and cheap recipes. You create a pin with a photo of a mom and 3 kids sitting down at the dinner table with the text, “20 Quick Recipes for Busy School Nights.”
Your next pin could be a photo of a young college student studying while they eat that says, “20 Meals That Every College Student Can Make.” And your 3rd pin can be a young couple cooking together that says, “20 Dinner Recipes for When You’re Broke” or “20 Easy Dinners for the Clueless Chef.”
You have just expanded your reach to 2 more big groups of users with the same article!
You may have written your article with just one of these audiences in mind, but it will actually be helpful and popular to several more audiences… really think about every group who could possibly benefit from your post, then give them each their own unique pin.
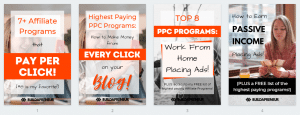
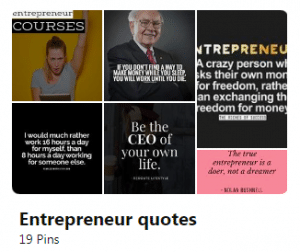
Look at the different audiences/keywords for pins below for example: 1) Affiliate Marketers; 2) Bloggers; 3) Work From Home; 4) Passive Income. They all lead to the same article, but they highlight a specific benefit for a specific group of people or search query.
File Name
Did you know that part of the Pinterest algorithm includes the file name of your pin image? So if you leave your file name as “IMG_427,” you’re hurting your rankings in the algorithm!
Use the file name as another opportunity for keywords, giving Pinterest another clue on what your pin is and who it’s for. Here’s how I like to do it in Canva:
- Create your 3-5 images as separate pages in one file (vs creating a new design for each one)
- Download the file, then rename each image using keywords (I usually just name all of mine the same thing, but you could also be a superstar and name them specific to the audience/image!)
(Note that Canva compresses your images into a zipped file, so you will need to unzip or extract before you can rename the files.)
New to Canva? Click HERE to sign up for FREE!
3. Descriptions & Keywords
Descriptions
When I first started pinning, I’ll be honest… I keyword-stuffed my descriptions. I tried to fit as many keywords as I could and used up my character limit every time.
It didn’t work. Not even a little bit.
Then… I got some amazing advice from a Facebook group member that changed everything: He told me that he only uses 2-3 keywords and 2-3 sentences PER PIN. Basically the complete opposite of what I was doing.
I decided to try it (it couldn’t be worse than what I was doing…), and IT WORKED! My very next pin that went out got about DOUBLE the link clicks, and the one after that got TRIPLE!
So here’s what you do for the best description for your 3-5 beautiful pins you made in Canva and are now scheduling in Tailwind (read below for Tailwind.. you’re gonna love it.)
-Make a list of the 5-8 keywords you found in your research
-Assign 2-3 to each pin based on the pin design and intended audience. Going back to our example from earlier, you could use “quick” and “easy” as keywords for one image, and “cheap” and “budget” as keywords for another image. Some keywords (“meal” and “dinner”) will crossover to more than one pin, and that’s fine.
-Include 1-2 keywords in your pin title (“Cheap Recipes That Taste Amazing”)
-Write a 2-3 sentence natural-sounding description using just the 2-3 keywords you’ve chosen for that pin. Write it just like you would say it, not as an advertisement
-Some recent advice I came across was to include the following 3 parts: 1) Question/Problem; 2) Answer/Solution; 3) Call-to-action
Related Article: How to Start a Money-Making Blog (6-Week Setup Guide)
EXAMPLE:
“Looking for budget-friendly meals? These cheap dinners have been so great while we’ve been trying to save money on our grocery budget. Check out this list and enjoy cheap meals that don’t even taste cheap!”
(Side note… obviously you should avoid being deceptive in your descriptions. Don’t claim that a diet or workout plan helped you lose 30 lbs if it didn’t! You can, however, quote a client or subscriber’s reviews/experience if they have something great to say about your product!)
Repeat for your next pin, using 2-3 new keywords chosen specifically for that image and audience. Again, you have probably tripled your potential impressions by focusing individually on each subset of future customers. That’s HUGE!
If you’re struggling with SEO in general, check out the video below to help boost your rankings!
[yotuwp type=”videos” id=”r9BwES6cIlI” ]
4. Tailwind (I know, just keep reading)
I know, you’re sick of hearing about Tailwind. Probably because you’re already using it, you don’t want to pay for it, or you just don’t see the need for it. I’ve recently tweaked my Tailwind strategy, however, and it’s working WAY better than the other strategies I’ve seen in courses and articles… so hear me out.
(Also, click HERE for a FREE trial of Tailwind before you commit to paying anything!)
In case you don’t know what Tailwind is, it’s an approved website that has basically partnered with Pinterest and aims to help Pinterest Business accounts be more successful. You can schedule pins (as in a few clicks from you and you have pins automatically being pinned for months…!), view more in-depth analytics for your Pinterest account and connect with others who are in your same niche.
Tailwind always has the most up to date information on Pinterest’s algorithm, and they create new tools or tweak their existing tools to make it easier for people like us to rank higher in the algorithm, while also saving you tons of time. Sounds pretty great, right? It totally is.
![]()
Interval Scheduling
Most of the articles I’ve seen about scheduling on Tailwind say to just use your Smart Schedule, and throw everything into your queue and let it go…
WRONG.
Several issues with this method, mostly that there is no strategy behind it. For example, a pin may be getting pinned to different boards too close together, flagging your account as spammy. Also, the schedule is random, so you’re not specifically putting your best content out on weekends/evenings/whenever your audience is most active, or even worse, it schedules other people’s content during those times!
The best strategy is using the Interval scheduler. It allows you to be intentional and strategic about your pin schedule, while still being automatic. PLUS it even allows you to optimize the times according to your audience’s habits!
Now, a quick rundown of how to use Interval scheduling.
First, remember from above that you should have 3-5 images created for your blog post or page URL, each with an image and description aimed at a specific audience.
- Add your pin image(s) to Tailwind
- Enter the boards, title and SEO optimized descriptions
- I usually do 2-4 boards per image (plus group boards and tribes)
- Click on “Use Interval” at the bottom of the pin (if it’s not there, make sure you have more than one board selected!)
- Select the first date/time you want your pin to go out.
- Look at your smart schedule for this. Select a day/time where there are lots of slots close together since this is when your audience is most active. This is usually on weekends, but it may differ depending on your niche!
- Pin to the MOST relevant board first (example: “Best Honeymoon Destinations” should go to your “Romantic Getaways” board before it goes to your “Travelling Tips” board.)
- Select an interval (this is how often you want your pin to go out, pinning to the next board on the list you’ve selected at each interval until it gets through all of them).
- You should be doing a minimum of 2 days in between pins.
- I usually do 5 days + a few hours for my interval. This spreads it out longer and reduces the risk of my account getting flagged. I also feel like it’s kind of a waste to pin it too often, as it will continue showing in feeds and searches long after I’ve pinned it if it’s a good pin!
- Select Interval Type.
- I usually leave mine as Open Time Slots since I refresh my Smart Schedule fairly often.
- You could also choose “Optimized” which will add in additional optimal time slots for these pins, leaving your Smart Schedule open.
- Click Set Interval, then Schedule.

Since I usually end up pinning one URL to 10-15 boards (including group boards), then this schedule will last me 2-3 months!
I also love how easy and clear the view is when your pins are in Draft mode. Being able to see all your pins side by side like that (vs pinning them manually and having them in separate tabs or windows) makes is SO easy to see the big picture of this pin’s impact and journey.
For example, if I have 5 different images for the same URL that I am scheduling, I want to see them all at once so I don’t accidentally pin to the same board twice or schedule them too close together. It also allows me to see all my descriptions at once so I make sure they are image/board-specific, and I am using all my keywords across the different images.
Tribes
Another reason I love Tailwind is because of Tribes. They are like group boards except 1 thousand million times better.
Tribes, like group boards, are niche-specific and usually have some rules about how often you can pin and re-pin. Unlike group boards.. these rules are actually monitored and enforced! So there’s no one person spamming up the whole board, and you have a lot better chance of your content being seen and shared.
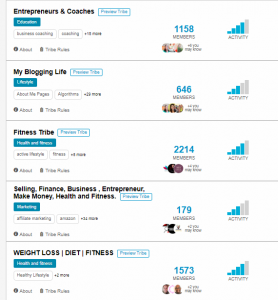
You want to be somewhat picky about the tribes you join, as there is a limit to both tribes and pins, depending on which Tailwind package you choose. You want a tribe with pretty good activity rates (as in, people actively pinning and contributing), but you don’t want one that is so active and saturated that your content will be pushed to the bottom 10 minutes after you post it.
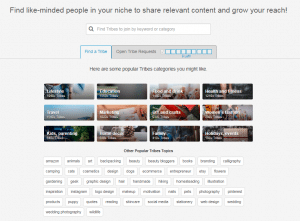
To find a good tribe, click on the little Tribes icon on your left menu, then click Find a Tribe. Here you can search for keywords relating to your niche (ex. Travel, health, blogging, etc.). If you’re not sure what to search, click on one of the feature categories and it will help you narrow it down from there.
Look for tribes that have 4-5 bars on their Activity rank, but I would recommend staying under 3,000 members so you don’t get drowned out. Click Join Tribe (or Request to Join if it’s private), and you’re all set!
Some people will share content to tribes before or at the same time as they are first sharing it to Pinterest, others will wait to see how it does on Pinterest and then only share the successful pins on Tribes. I honestly do both, but that’s because I have power ups so I’m not as limited on the number of pins I can share.
If you’re just starting out on Tailwind, I would recommend just sharing the content that you know does fairly well on Pinterest already, that way you don’t waste your limited allowed shares! Once you upgrade your package, or even if you just get the hang of what kind of content your tribes like, then you can start sharing new content with them without first testing it on Pinterest.
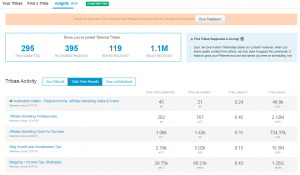
Another way Tribes are better than group boards is that they come with their own analytics! WHAT. Tailwind gives you an awesome breakdown of how well your tribes are working for you with how many re-shares you get, virality scores, and your top supporters.
It also has a “Potential Reach” metric that shows how many potential impressions you could get from your re-shares based on the popularity of other tribe members. This number makes it really easy to compare tribes, as you may get a way wider reach from just a few shares from top pinners vs a lot of shares from newbies who don’t have very many followers.
Check your Tribe Insights (analytics) every week to see what kind of content is working for which tribes so you don’t waste good content on people who don’t appreciate it! If you consistently get low or no shares from a tribe.. ditch it, and join a new one. Again, don’t waste your limited number of tribes if they’re not going to pay you back!
Still not sure about Tailwind? No worries, you can try it out for FREE by clicking here to see if it’s worth it for your business!
Also, Tailwind can now be used for Instagram posts as well. Read here to find out more about using Instagram to get traffic to your website!
5. Sharing Others’ Content
When I first heard that you should be sharing other users’ content on your own boards, I was a little confused on why I would be spending time making my competition successful… lol.
There are a few reasons to save content from other accounts:
- More content on a board helps the Pinterest algorithm better understand what your board is about and who to promote that content to
- Pinning good content (even if it’s not yours) gives you a good reputation and can really help you get more followers
- Collaborating with others in your niche is a great way to build a network, stay updated on news in your niche, get content ideas and gain followers who actually care about your content because it’s similar to their own
- It’s required by Tailwind tribes and Pinterest group boards :)
Here’s the thing, though, you can accomplish all the above WITHOUT pinning content that competes with your own. This is something I learned recently and it made me want to slap my past self in the face for not thinking about it sooner.
[yotuwp type=”videos” id=”gU9t-gioTqE” ]
Non-competing Content TYPE
When you’re scrolling through a group board or tribe looking for good content to share, look for pins that are different TYPES of content than you have.
My favorite type of pins to re-share are infographics. I personally never do infographics because they don’t get clicks. All the info is right there laid out for you, so why would you click?
Users LIKE infographics though, so it’s good to have them on your boards, just not good to waste your time creating them when they’re not going to actually get traffic to your site. By re-pinning others’ infographics, you please your audience without wasting any extra time.
Non-Competing Articles
If you’re not finding a lot of infographics, podcasts, quotes, etc. in your niche, the most important thing about sharing others’ content is to make sure it doesn’t compete with your own content!
If you have a “20 Workouts You Can Do At Home” post, don’t save a similar post from another account! Find pins that fit in your niche, but that you don’t typically write about.
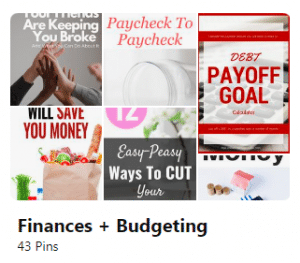
I have actually created a couple of boards specifically for pinning external content that is in my niche but not in my expertise.
For example, my niche is financial freedom and passive income, but I focus on how to MAKE the money, not so much on what to do with that money once you have it. So I created a financing and budgeting board. This appeals to a similar audience, but since I never really write about that, I don’t have to worry about that content competing with my own.
The 80/20 Rule
When I first started on Pinterest, I pinned a LOT of content from other accounts… At least half, maybe even more! This was to try to establish a presence on Pinterest while I worked on my own content.
Now, however, I only pin as much content as I have to in order to follow tribe and group board rules. Pinterest knows by now what my boards are about and I follow enough people that I stay in the loop for my niche.
Once you feel like you’re at that point too, you can follow this same strategy. Aim for about an 80/20 ratio so that you always have a lot more of your own content going out.
Conclusion
Well, there you have it. I hope there was at least one “AHA” moment for you in this post, and that it helps you avoid some of the mistakes I made in Pinterest Marketing!
If you liked this article, be sure to check out related articles below and subscribe to our mailing list so you’re always kept in the loop! (Plus you’ll be first to know about our frequent freebies and promotions!)
Check out our other articles!
Top Affiliate Programs for Pinterest Marketing
5 Best Affiliate Marketing Courses (Plus 3 FREE Options!)
Highest Paying Pay-Per-Click Affiliate Programs
How to Start a Money-Making Blog: 6-Week Setup Guide
Get Started With Affiliate Marketing
Highest Paying Affiliate Programs
Pinterest Marketing Strategies